Total Body Pyramid Bench Workout

Total Body Pyramid Bench Workout with RitFit

Disclosure: While I was compensated to write this post and I received this bench in exchange for my review, all opinions, images, and workouts are my own. Gotta have the disclaimer here, but I only promote the products I love. Thank you for supporting the brands that support this blog!

Hi friends! It’s been a good long while since I’ve posted a workout here on the blog. I’m in the home stretch of finishing my Master’s degree (MPH) and have started a new job in which I’ll transition to full time in August when I graduate (!). That plus teaching classes has kept me QUITE busy! But today, I’m pumped to bring you a new workout with a new piece of equipment: the RitFit foldable adjustable workout bench. The bench is awesome and easily adjustable, like most workout benches you see at the gym or club (you just pull the pin out and lock it in place in a matter of seconds). But I think the thing that sets this one apart from the others is its ability to fold up and be stored. It’ll fit under your bed, in a closet, in your trunk even. So, it’s a great piece of home gym equipment, especially for small spaces!

But let’s get to the workout! This one follows a pyramid structure starting with 10 reps of every exercise going down to 1. I like the pyramid format for a quick and effective sweat sesh, and you can make it more of a HIIT workout with minimal rest periods. Ready to give it a try??

RitFitBenchWorkout_illustrator-01.png

Total Body Pyramid Bench Workout

What You’ll Need: The RitFit adjustable bench (or another sturdy workout bench that can adjust), and a medium dumbbell or kettlebell (optional).
What You’ll Do:
Aways warm up before beginning any workout. After your warm up, start with 10 reps of every exercise. After 10, move down to 9 reps. Keep going down to 1 rep each. Aim for minimal rest. (View a video of the exercises on RitFit’s Instagram.) Fun challenge: time yourself and see how long it takes you to complete the pyramid. Try again in a week or two and see if you can beat your time!

- Start with the bench seat and back flat -

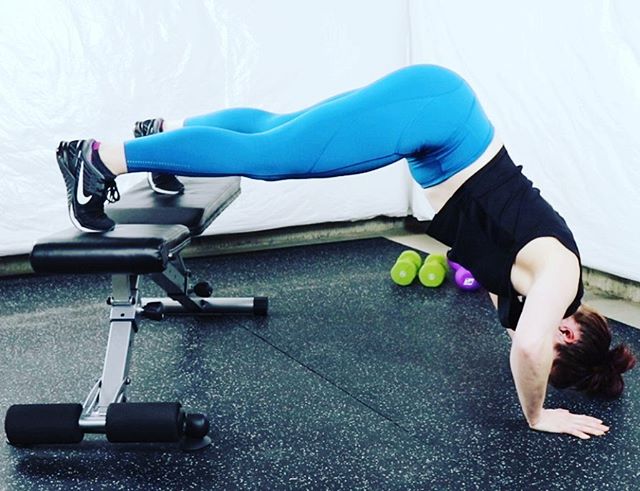
Declined Pike Push Ups - start with your feet on top of the bench and hands on the ground in a pike position. Keep a neutral spine, look back at the bench, and lower yourself down, bringing the crown of your head toward the floor. Push back up through your shoulders. Trainer Tip: you should feel this one more in the tops of your shoulders rather than your chest.

Bench Hop Overs - place your hands on the seat of the bench with your body off to one side. From here, hop over the bench back and forth, bringing your heels up to your glutes.

Side Plank Adductor Lifts (each side) - get into a side plank position on your forearm. Place the inside of your top foot on the bench, other leg resting on the ground. From here, engage your abs and press through your top foot engaging your inner thigh as you lift your bottom leg to meet the bench. Do # of reps on each side.

- Adjust the back of the bench to an upright position, 2 clicks up from neutral -

Reverse Hyperextensions - trust me, this bench is sturdy and stable enough to support you here! Place your hips over the top of the bench back (shown), hold onto the seat, and lower your legs down. From here, lift your legs and drive your heels upward, squeezing your glutes and hamstrings.

- Adjust the bench back down to neutral -

Feet-Elevated Burpees - these are tough, but SO fun! I find it easier to start with your feet on the bench in a plank. Then jump your feet off to meet your hands, and jump up, exploding through the legs. Just like a burpee, place your hands back down and jump your feet back on top of the bench.

- Lower the bench back to a decline position (all the way down) and raise the seat up all the way -

Declined Sit Ups - weight is optional here. I’m using a 10lb kettlebell, but feel free to add more weight, use a dumbbell, or just your body weight. If using a weight, keep it by your chest. Lie down on the bench and hook your feet under the foot hold. Engage your abs and lift your back off the bench to a seated position, and then lower back down.

Whew! How’d it go? I hope your whole body is thanking you! Now fold up and store that bench away, but not too far - I challenge you to try this workout again and see if you can get it done in a shorter amount of time!

Readers chat with me! Do you use a bench in your workouts? What are your favorite bench exercises? Have you ever done a pyramid workout before? If so, how do you like them? If not, do you think you’ll try this one out?

BlogSignature_2018_small.png

What Your Body Composition Test Isn’t Telling You: A DEXA Scan Review

DEXA Scan Body Composition Testing

Disclosure: I received this test free of charge in exchange for my blog review and community education. All opinions, test results, photos, and content are my own. Huge thank you to the Mandis Agency and Iowa Ortho for their generosity and support of this blog!

Body composition testing—I know you’ve heard of it. Chances are you’ve probably gotten yours tested at some point in your life, whether it was using water displacement for sports in high school, a bio-impedance scale at your gym, or caliper testing at home or with your doctor. There are MANY options to choose from when you want to test your body composition and all are beneficial. The most common approach I see in the fitness world is either calipers or bio-impedance scales. Calipers, unless used by a trained professional, can result in significant differences between tests (not to mention, who wants to pinch their skin to measure their body fat? Talk about making you feel bad about yourself…). Bio-impedance scales (BIA) are certainly easier and can give you a general idea of body fat percentage (BF%), lean muscle mass, hydration status, etc. However, the BIA is heavily dependent on time of day, hydration, and electrolyte status to name a few confounds. So how can you accurately and reliably measure your body’s make up? Enter: The DEXA Scan.

What is it? Will it hurt? What’s the procedure like?

Dexa Scan table

The DEXA scan (Dual-Energy X-Ray Absorptiometry) was originally developed in the 1980s to measure bone density in the aging population. Now, in addition to bone density, it is used to measure subcutaneous and visceral adipose tissue (surface layer body fat and fat around internal organs, respectively) and lean muscle mass distribution. It is the gold standard in body composition testing. Why? Well, for one, it’s the most reproducible body composition test out there. Also, hydration, electrolytes, proximity to a workout, etc. have no bearing on the results. (Insert raise-the-roof emoji here… and cry-laughing emoji… k, side bar: there need to be emojis for bloggers.) Not to mention, unlike a bio-impedance scale that will give you an overall reading of body composition, a DEXA scan tells you exactly where you’re holding fatty tissue and muscle, down to each arm, leg, and foot.

Dexa Scan

Now, let me assure you, although these images look like they’re very medically-oriented, the DEXA scan does not hurt, and you don’t have to do anything other than lie still on a table. The orthopedic clinic I went to had me undress and wear one of those oh-so-stylish hospital gowns (insert cry-laughing emoji again, haha). They also taped my feet together to keep my legs from rotating outward (pretty sure that’s common practice for the scans). After that, you lie on the table and it slowly glides you back and forth under the scanner. It’s not noisy at all and you cannot feel anything other than the table moving. It’s a painless procedure that lasts all of 4 minutes. Note, though, that lying still means no talking either. I definitely tried to have a conversation with the nurse while this was going on and she promptly shut me up. HAH.

The Results (and yes, these are mine).

DEXA Scan Results

Above is the full report you receive once the scan is done. In the spirit of full transparency, I wanted to post my individual report here instead of the generic sample report from Jane Doe. I always keep it honest on the blog, and this is my way of showing you all you don’t need to be ashamed of your body, whatever your numbers are. Yep, I’ve definitely gained some weight in recent years (upwards of 20lbs). I used to be somewhat ashamed of that, but honestly, I’m really not concerned with it anymore. I’m more interested in how my body functions and feels. That said, let’s look at this more in depth.

Body Images and Composition Chart

Below are a zoomed in look at the images of my body and the composition results chart. The images, as you can see, are of the different types of mass (left) and ratio of fat to area of the body (right). In the left image, you can visually understand your body composition. No bio-impedance scale, water displacement tank, or caliper can do that! (For reference, blue = bone; red = muscle; yellow = fat.)

DEXA Body Images

Now here’s the interesting part. This chart gives you the exact distribution of fat, lean muscle, and bone mineral content (BMC) per body area. So cool! So, for example, my left arm has 2.20lb of fat and 5.51lb of combined lean muscle and bone. The fat percentile columns are a comparison of your body to “young normal range” (YN—a large group of 20-30 year olds), and age-matched (AM—people your specific age). The lower the number, the better (for reference, they go from 1-100).

DEXA Body Composition Results

The other chart pictured in the first full image is a list of different fat ratios throughout my body. These are important because certain ratios can indicate a higher risk for obesity, increased risk for cardiovascular disease, and other health complications. For example, % Fat Trunk / % Fat Legs is a ratio of how much adipose tissue you have in your trunk (abdomen, back, chest) versus your legs. The ideal ratio for women is below 0.8, and below 1.0 for men. The higher the ratio, the higher percentage of fat you likely hold in your trunk, which can be a risk factor for certain heart and pulmonary conditions.

The Takeaways and Cost

So what does one make of all this? It’s a lot of information thrown at you all at once! I’ll admit, even though I understood some of it on my own, without a professional explanation, I wouldn’t have been able to make sense of the more detailed results. The main take-home point here is to use this as a tool to reliably measure your body composition across time. I’d suggest getting multiple scans done—once as a baseline measure, and then again maybe a few months into a new fitness routine or healthier way of eating to track your progress.

The cost of this test will depend on where you are and what clinic/orthopedic facility you go to. For those local to Iowa, Iowa Ortho does the DEXA scan for $39.99. Insurance does not usually cover them, so they are typically an out of pocket expense, but are very affordable. For more info, and to check your local DEXA provider, go to their website here.

Readers: chat with me! Have you heard of a DEXA scan before? Have you ever had one done? If not, are you interested in doing one? Do you track your body composition in other ways? How’s your Monday going?

Making Time To Slow Down with Resveralife

Resveralife Review

Disclosure: While I was not paid to write this post, I was gifted these items by Resveralife for review here on the blog. I always keep it honest here, so all content, opinions, and images are my own. Thank you for supporting the brands that support this blog!

It seems like everyone’s life is crazy busy… but I don’t need to tell any of you that. I could list all the reasons why my life has been insanely hectic recently (graduate school being number one), but that’s not the point of this post. Yes, all of us have a crazy number of to-dos, life demands, relationship demands, worries, stressors, etc. etc., it’s no wonder we’re all so strung out. It’s funny, I was sitting in the sauna recently and a woman (speaking to her friend about a meditation & yoga class) said, “It’s sad when we have to take a class to learn how to relax.” Ain’t that the truth.

But it really is true. We have to force ourselves to MAKE the time and space for calm, for slowing down. Grad school has been quite a challenge, but this last semester has me freaking out. I’ve never felt this sense of dread and imposter syndrome like I do now trying to develop my culminating research project. The mounting anxiety I have is almost paralyzing sometimes (and I’m normally a cool-headed person), so I’ve been purposefully taking a few minutes every night to lie down on the floor, close my eyes, breathe, and listen to calming music—a mini meditation if you will. I’ve also (slowly) been trying to reintroduce yoga into my routine. I’m not naturally drawn to it (Go strength! Lift all the weights!), but I am taking classes here and there to try to introduce calm. Given all of that, I was excited about the chance to review a few products that can certainly help with this relaxation vibe and create that calming space we sometimes need. Enter Resveralife.

Aromatherapy and Relaxation

Resveralife Essential Oil Diffuser

I was pretty pumped to try this essential oil diffuser. I’ve wanted to get into oils for a while, but I don’t want to walk around smelling like them, so diffusing them was the next best thing. I’ve been diffusing lavender before bed just about every night, and maybe it’s a placebo effect, but I do feel like it helps me relax and wind down. In fact, those 5 minutes of lying on my floor listening to calming music or a guided meditation are becoming something I really look forward to.

The diffuser itself is very lightweight and easily used. The plastic top comes off, you just put in a few ounces of water and a few drops of oil, and voila. I’m sure that’s how almost all diffusers are, but this is the first one I’ve ever had. :) I like the ambiance it creates with the LED lighting that gradually transitions between all colors on the spectrum. The one drawback I found is that the plastic top doesn’t lock into the base, so if it tips, the lid just comes right off. Great for ease of filling, but could be better designed. I also think it’s a bit on the expensive side at $59.99, especially since it doesn’t come with any oils. That said, it seems like diffusers can run the gamut from $20 to $120+, so this one is right in the middle.

Resveralife Essential Oil Diffuser
Resveralife Essential Oil Diffuser red

Stretching & Yoga

Stretching and yoga are two things I am admittedly horrible at maintaining in my fitness routine. I feel like a hypocrite for saying so, but I have to actively think about making time to stretch. (Probably why my muscles and joints are now screaming at me these days to go slower!) I’ve been trying to attend more yoga classes recently in order to force myself to move slower, breathe deeper, and have an hour of guided stretching that I wouldn’t do otherwise.

Resveralife Mandala Yoga Mat

It sounds really silly, but having a nice looking, good quality yoga mat helps to actually want to go to class or stretch at home. The mandala mat from Resveralife fits the bill. Because yoga hasn’t ever been something I practice regularly, I never invested in a quality yoga mat, so I am excited to have one now. It’s really well made with a beautiful blue microfiber top and non-slip rubber bottom. It does get dirty easily (and attracts all kinds of dog hair, haha), but that’s no problem because this thing is machine washable! What a nice feature. :) This one will run you $50, which I think is perfectly reasonable for its quality and design, especially compared to other mats on the market.

Resveralife Yoga Mat

The mat bag comes separately ($30), but it’s so nice to have. This is another thing I never invested in because I just always carried my mat. It’s funny looking back though, because my mat would always unroll under my arm and I’d think to myself “man, I need to get a mat bag or strap to harness this thing…” The bag matches the mandala pattern on the mat and has a little zip pocket on the outside for holding essentials—handy so you don’t have to carry this AND your purse AND your gym bag. (Anyone else out there a bag lady? * raises hand *)

Resveralife Mandala Mat

So here’s to learning to slow down, moving with intention instead of speed, taking deeper breaths, and calming the body in order to calm the mind. I’m excited to start this new phase of my fitness regimen, and hope you’ll join in if you feel you need to introduce some peace and mindfulness into your life. (Come follow along with me on Instagram!)

Readers: chat with me! Do you MAKE time for calm and relaxation in your day? What does that look like for you? Do you currently diffuse essential oils, practice yoga, and/or purposefully stretch? How have they benefitted you? If not, are they something you want to try? What practices do you have that help you slow down?

BlogSignature_2018.png